Step 1 - Verify that the thermostat is working before you add it to the Z-Wave network
Step 2. Add the thermostat into the Z-Wave network
It's now time to add the ZTS-100 thermostat to your Z-Wave home network.
Step 2.1. Make sure the Vera is in include mode and less than 3 feet away from the ZTS-100.
Step 2.2. Press and hold the "Home" key for 2 seconds. The screen should display "noc", indicating it currently has no connection to any network.
See the example below:
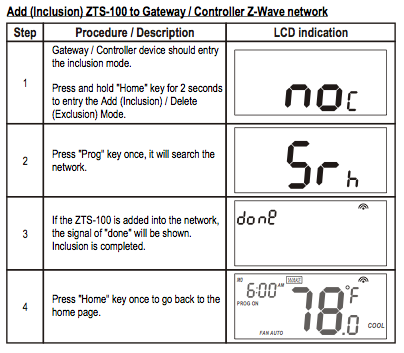
Step 2.3. Press the "Prog" key once. This instructs the ZTS-100 to search for the Z-Wave network and begin the process of self-configuration. The display will show "Srh", signalling it has started searching for Z-Wave networks (your Vera) nearby.
Once the ZTS-100 completes the adding and configuration process, you should see "done" shown on the display.
Step 2.4. Press the "Home" key once to go back to the main screen display.
And that's the end of Step 2! You have connected your ZTS-100 thermostat to your Vera home network.
Now on to the fun part...
Read Step 3. Setting up a scene to control your thermostat from your iPhone.
No comments:
Post a Comment